You might be in a situation in which you need a shared file system between multiple VM or between your VM and host OS on which you can perform both read and write operation simultaneously. Oracle Virtual Box has a answer to this in form of Shared Folder feature but to use Shared Folder feature in your VM, you must install Virtual Box Guest Additions. This simple looking Virtual Box Guest additions is quiet complicated to setup in Linux VM, it becomes even more complicated if you are not a Linux admin. In this blog we will go through step by step process to setup Virtual Box Guest Additions and Add a Shared Folder in VM and access it.
Step1: Prerequisite
To configure Virtual Box Guest Addition, you need to have kernel-devel, gcc, make and elfutils-libelf-devel package installed. Run below command to check if packages are already present.
yum list gcc make kernel-devel elfutils-libelf-devel
To install these packages run below command with root privilege
yum -y install gcc make
yum install kernel-develyum install elfutils-libelf-devel
To check if these
Apart from packages, your VM must have an optical drive configured. To verify if your VM has an optical drive, you need to select your VM and go to Settings and in Settings go to Storage section. In Storage section you will get a screen like below.
If you find a disc like icon under Controller: IDE or Controller: SATA, it indicates that your VM has an optical drive configured. In case it is missing click on icon Adds optical drive to add Optical drive to your VM. to add Optical drive under Controller: IDE your VM should be in Powered Off state but for Controller: SATA you can add Optical drive even if your VM is in Running state.
Step2: Configure Virtual Box Guest Addition
Add VBoxGuestAdditions.iso file to your VM Optical drive, this can be done even if your VM is in Running state. To do this open your VM screen, click on Devices Menu , select Optical Drives and then select VBoxGuestAdditions.iso . If VBoxGuestAdditions.iso is unavailable then click on Choose a disk file... and browse to Oracle Virtual Box Installation folder to get the .iso file.
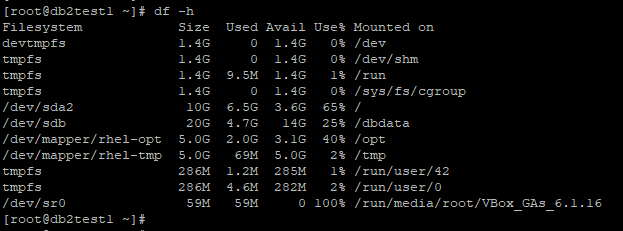
After selecting VBoxGuestAdditions.iso file go to your VM terminal and check optical driver got mounted or not. Use df -h command to check it.
You will see a new file system with name similar to /run/media/root/VBox_GAs_6.1.16.
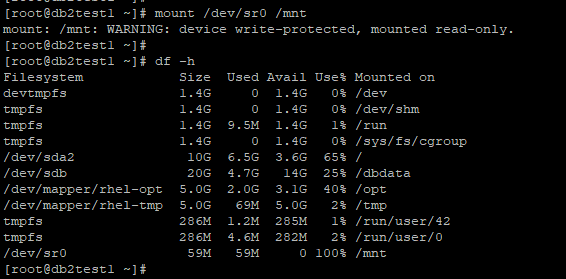
If no new file system is available then manually try to mount optical drive.
To manually mount your optical drive run below command
mount /dev/sr0 /mnt
Before that ensure device /dev/sr0 is available by executing ls -lrt /dev/sr0
Once Optical drive is available switch current working directory to Optical Drive path and list content using ls -lrt command.
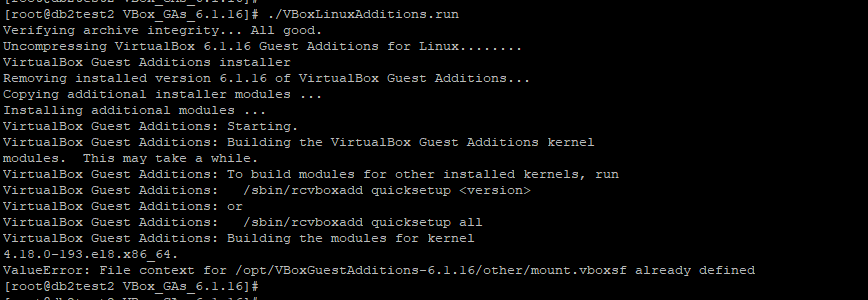
Execute VBoxLinuxAdditions.run to configure Virtual Box Guest Addition
./VBoxLinuxAdditions.run
Message ValueError: File context for /opt/VBoxGuestAdditions-6.1.16/other/mount.vboxsf already defined can be safely ignored.
If all prerequisite are meet then Virtual Box Guest Addition will successfully get configured.
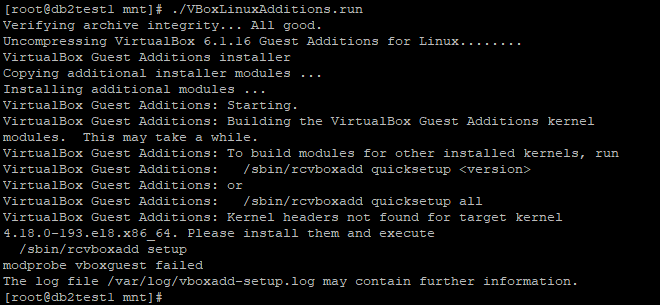
If kernel-devel or gcc or make package is missing you might get below error
VirtualBox Guest Additions: Kernel headers not found for target kernel
The log file is useless as it only contains message "modprobe vboxguest failed".
If kernel-devel, gcc, make package is present but elfutils-libelf-devel package is missing then you might get below error
VirtualBox Guest Additions: Look at /var/log/vboxadd-setup.log to find out what
went wrong
ValueError: File context for /opt/VBoxGuestAdditions-6.1.16/other/mount.vboxsf already defined
modprobe vboxguest failed
The log file /var/log/vboxadd-setup.log may contain further information.
In vboxadd-setup.log you might see below error indicating elfutils-libelf-devel package is missing.
Building the main Guest Additions 6.1.16 module for kernel 4.18.0-193.el8.x86_64.
Error building the module. Build output follows.
make V=1 CONFIG_MODULE_SIG= CONFIG_MODULE_SIG_ALL= -C /lib/modules/4.18.0-193.el8.x86_64/build M=/tmp/vbox.0 SRCROOT=/tmp/vbox.0 -j1 modules
Makefile:975: *** "Cannot generate ORC metadata for CONFIG_UNWINDER_ORC=y, please install libelf-dev, libelf-devel or elfutils-libelf-devel". Stop.
make: *** [/tmp/vbox.0/Makefile-footer.gmk:117: vboxguest] Error 2
modprobe vboxguest failed
Step3: Add Shared Folder to your Oracle VirtualBox Linux VM
You can add Shared folder to your Oracle VirtualBox Linux VM even in Running state. To add Shared folder, open your VM screen, click on Devices menu, select Shared Folders, click on Shared Folders Settings...
After clicking on Shared Folders Settings... below screen will open
Click on Adds new shared folder. icon which will open below screen
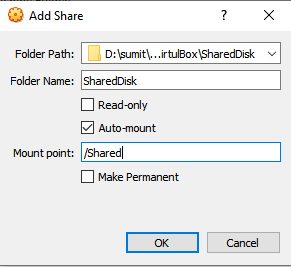
In Folder Path: browse and select folder which you want to share with your VM or a path which will act as shared file system between your VM. Folder Name: gets automatically populated. Check Read-only if you want your VMs can only perform Read-Only operation. For both Read and Write operation keep Read-Only checkbox as unchecked. Check Auto-Mount checkbox to auto mount your shared folder after VM restart. Specify name of file system which you would like for your Share folder on your guest VM in Mount point: field. Check Make Permanent checkbox. Click on OK button to create your Share folder and auto mount it.
You would get below screen indicating your configuration for Shared Folder.
Click on
OK button to close screen. Check on your VM terminal for new FS with name same as name mentioned in
Mount point: field.
This new Shared file system will only be accessible to root user. To make it accessible to other users, add those users to group vboxsf.
Use below command to add your user to group vboxsf.
usermod -a -G vboxsf <username>


Thank you sir.
ReplyDeleteThanks!! Keep visiting :)
DeleteStep by step with clear explanation really gives good grip to understand the subject with an ease. And you are really doing good job sumit. KEEP IT UP!
ReplyDeleteThanks!! Keep visiting :)
ReplyDelete