In blog DB2 Pacemaker we covered why to use DB2 Pacemaker, Pacemaker process and limitations of DB2 Pacemaker in DB2 version 11.5.8.0 and earlier. In this blog we will go through prerequisite of DB2 Pacemaker, DB2 Pacemaker installation, Configure Pacemaker cluster for HADR, Configure Quorum Device.
DB2 Pacemaker Prerequisites:
- DB2 Version: DB2 11.5.5.0 or above. In DB2 11.5.4.0 DB2 Pacemaker was introduced as technical preview and not ready for production use. I would suggest to use DB2 11.5.5.0 or above.
- OS Version: RHEL 8.1 or above, SLES 15 SP1 or above.
- Packages: python3-dnf-plugin-versionlock
- Port: TCP: 3121, 5403 and UDP: 5404,5405
- Passwordless communication for root user between DB Nodes.
Verify DB2 Pacemaker Installation:
You can verify Pacemaker Installation by executing below command:
rpm -q pacemaker; rpm -q corosync; rpm -q crmsh

If you get above output it means DB2 Pacemaker is installed. Note highlighted keyword db2pcmk in above output, this indicates Pacemaker installed is part of DB2 integrated Pacemaker and not linux distro provided Pacemaker. If db2pcmk is not present in output, then you need to remove those packages and install DB2 Integrated Pacemaker.

If you get above output it means pacemaker is not installed.
Pacemaker Installation:
If you install DB2 at version 11.5.6.0 or latter, DB2 Pacemaker gets installed by default if you meet all prerequisites. If you are on DB2 version 11.5.5.0 or lower and upgrade it to 11.5.6.0 or above, DB2 Pacemaker is not installed even if all prerequisites is meet and we have to manually install it. Pacemaker installation binary is present in path <DB2 Installation Binary>/db2/linuxamd64/pcmk
DB2 Pacemaker prereqcheck
Run below command to verify if all prerequisite of DB2 Pacemaker is meet or not.
./db2prereqPCMK

If you get above output, it means all prerequisite of DB2 Pacemaker is meet and you can proceed with Pacemaker installation.
Install DB2 Pacemaker
Run below command to install DB2 Pacemaker only after ensuring prerequisite is meet.
./db2installPCMK -i

Configure Pacemaker Cluster:
Before proceeding with Pacemaker cluster configuration, ensure HADR is configured on DB2 database, HADR_SYNCMODE is SYNC or NEARSYNC. HADR_PEER_WINDOW is set to a value of 120 or above. HADR_STATE is PEER.
Also ensure Passwordless SSH for root user is in place.
We will configure Pacemaker using db2cm utility present in $INSTANCE_HOME/sqllib/bin. db2cm utility must be executed as root or user with sudo privilege.
Pacemaker for HADR can be configured only between Primary and Principal Standby node. We cannot configure Pacemaker cluster between Primary and Auxiliary Standby node or between Auxiliary standby node.
Pacemaker configuration can be done from either Primary or Principal Standby node.
Create Domain:
First step of Pacemaker installation, it to create Pacemaker domain.
./db2cm -create -cluster -domain TEST_CLUSTER -host db2test1 -publicEthernet enp0s3 -host db2test2 -publicEthernet enp0s3
where
TEST_CLUSTER => Domain name of the cluster. It can be any name to uniquely identify the cluster.
db2test1 => hostname/ip address of first node in the cluster
enp0s3 => Ethernet port of first node to be used to pacemaker communication
db2test2 => hostname/ip address of second node in the cluster
enp0s3 => Ethernet port of second node to be used to pacemaker communication
You can check different ethernet port available on your server using command ifconfig,
Add DB2 Instance to Cluster:
Once domain is created, next step is to add db2instance to cluster. Run this command twice for each instance you want to configure in cluster for both nodes. Command can be run from any node of the cluster.
./db2cm -create -instance db2inst1 -host db2test1
./db2cm -create -instance db2inst1 -host db2test2

where
db2inst1 => db2instance on node1
db2test1 => hostname/ipaddress of node1
db2inst1 => db2instance on node2
db2test2 => hostname/ipaddress of node2
This command only map db2instance with Pacemaker cluster. It does not create a db2 instance.
Add Database to cluster:
Once instance is mapped to cluster, add database to cluster. This need to be done for each database in instance for which auto failover is required. Command can be run from any node of the cluster.
./db2cm -create -db SAMPLE -instance db2inst1

where,
SAMPLE => datbaase to be added to cluster for auto failover
db2inst1 => db2instance under which database is present.
This command only map database with Pacemaker instance. It does not create a db2 database or catalogue remote database in other instance.
ADD Virtual IP (VIP) to database:
You can add virtual IP for both Primary and Standby node. Primary node VIP is PrimaryVIP Standby node VIP is StandbyVIP. Below command will work on on premise environment. For public clouds, check public cloud documentation on creating virtual IP before using below command. It is upto you if you want to use both PrimaryVIP and StandbyVIP or only PrimaryVIP or no VIPs.
Adding VIP is not compulsory, your pacemaker cluster can work without VIP as well. You can use Automatic Client Reroute (ACR) instead of VIP to route traffice to Primary node in case of failover.
./db2cm -create -primaryVIP 192.168.0.243 -db SAMPLE -instance db2inst1
./db2cm -create -standbyVIP 192.168.0.244 -db SAMPLE -instance db2inst1

where,
192.168.0.243 => VIP for database SAMPLE
192.168.0.244 => VIP for database SAMPLE
SAMPLE => Database name for which VIP is to be created
db2inst2 => db2 instance under which database is present.
Monitor Cluster Status:
You can monitor cluster status using below commands, commands must be run as root or user with sudo privilege.
crm status
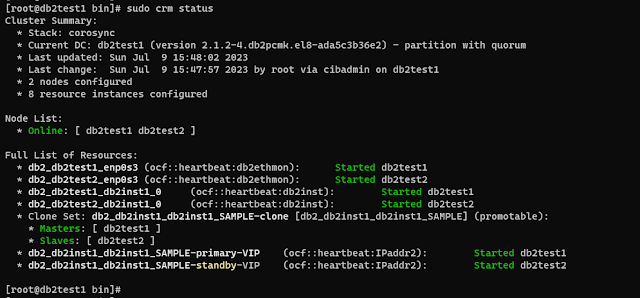
In above output, you can see status of node, network port, db2 instance, database and VIP. Here Master indicate that it is Primary Node and Slave indicate that it is Standby node.
./db2cm -list
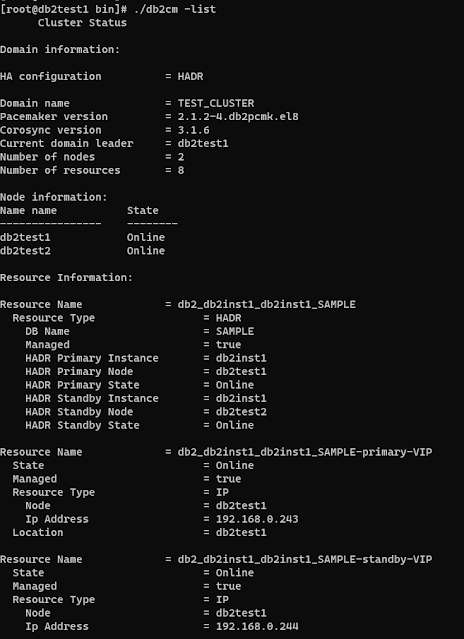
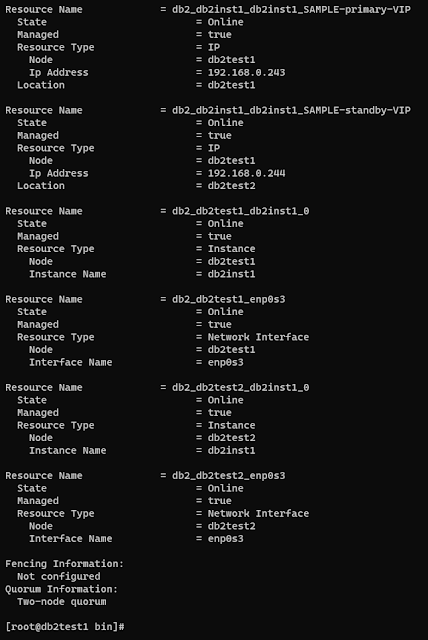
In above output you can get details of all resources configured in Pacemaker cluster.
Configure Quorum Device:
Quorum acts as a tie-breaker in case there is conflict between nodes to determine which should be primary node. To configure Quorum device you would need a third host. Pacemaker does not support IP base quorum or disk base quorum. This third node can be any other db2 database server, application server or an independent node just to server the purpose of Quorum device.
In case your environment has more than 1 Pacemaker cluster, you can use same quorum server for all Pacemaker cluster, provided each cluster has a unique domain name.
You can use RHEL7 host as well for Quorum device but it is recommended to be on RHEL8.
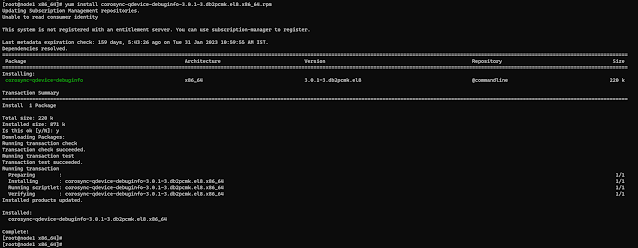
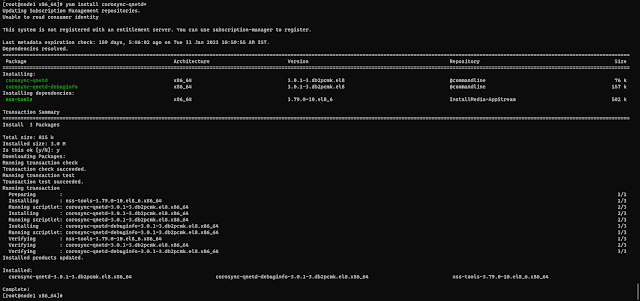
Before configuring Quorum, you need to install corosync-qdevice-debuginfo, corosync-qnetd, corosync-qnetd-debuginfo packages on Quorum host.
These packages are available in db2 installation in path <DB2 Installation Binary>/db2/linuxamd64/pcmk/linux/rhel/x86_64
yum install corosync-qdevice-debuginfo-3.0.1-3.db2pcmk.el8.x86_64.rpm
yum install corosync-qnetd*
Once above packages are installed on Quorum host, ensure to configure Passwordless ssh between root user of DB nodes and Quorum host. This is temporary requirement, once Quorum configuration complete, you can revoke passwordless ssh betweeen Quorum host and DB nodes.
After configuring passwordless ssh between Quorum host and DB nodes, run below command from any DB node in cluster as root or user with sudo privilege.
./db2cm -create -qdevice node1

where,
node1 => Quorum device hostname or ipaddress
Verify Quorum Status from DB Server:
Run below command as root or used with sudo privilege.
corosync-qdevice-tool -s

Verify Quorum Status from Quorum Host:
Run below command as root or used with sudo privilege.
corosync-qnetd-tool -l

If you liked this blog and interested in knowing more about DB2, please subscribe by clicking on Subscribe to ChoudharySumit.com by Email.
Thank you the informative article. I will configure pacemaker cluster in the environment and can come back with the results.
ReplyDeleteHow to add DR node(out of pacemaker cluster)and do the failover to DR node. DR node will be primary and the principle primary and principle standby will become standby.
ReplyDeleteAwesome
ReplyDeletesimple explanation and steps.
ReplyDelete