Standby Node : db2test2, Instance : db2i1

Step 1: Create Local KeyStore
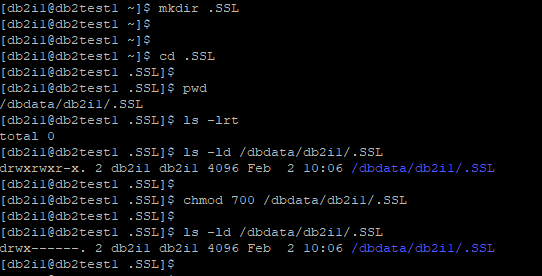
Before creating Local KeyStore, create a folder to keep Local KeyStore and restrict access by changing permission to 700.
db2test1:
db2test2:

Create Local KeyStore on db2test1 and db2test2:
gsk8capicmd_64 -keydb -create -db "TESTDB_HADR_SSL.ps12" -pw "P@ssw0rd_Db@i#" -type pkcs12 -stash


Step 2: Create Self Signed Digital Certificate
We will user Self signed digital certificate, you can also use CA signed digital certificate.
db2inst1:
gsk8capicmd_64 -cert -create -db "TESTDB_HADR_SSL.ps12" -stashed -label "TESTDB_HADR_SSL_PRIMARY" -dn "CN=db2test1"

db2inst2:
gsk8capicmd_64 -cert -create -db "TESTDB_HADR_SSL.ps12" -stashed -label "TESTDB_HADR_SSL_STANDBY" -dn "CN=db2test2"

Verify Certificate in KeyStore on db2test1 and db2test2:
gsk8capicmd_64 -cert -list -db TESTDB_HADR_SSL.ps12 -stashed


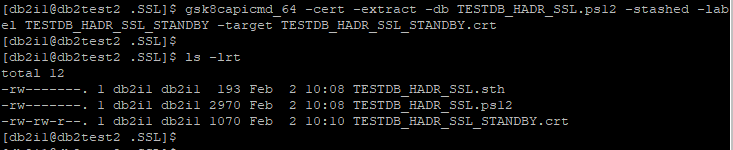
Step 3: Extract Certificate from Keystore
Certificate public key will get exported to a certificate file which will be used for adding public key to other nodes in HADR setup.
db2inst1:
gsk8capicmd_64 -cert -extract -db TESTDB_HADR_SSL.ps12 -stashed -label TESTDB_HADR_SSL_PRIMARY -target TESTDB_HADR_SSL_PRIMARY.crt

db2inst2:
gsk8capicmd_64 -cert -extract -db TESTDB_HADR_SSL.ps12 -stashed -label TESTDB_HADR_SSL_STANDBY -target TESTDB_HADR_SSL_STANDBY.crt
Step 4: SCP extracted certificate file to other nodes in HADR setup
db2inst1:
scp TESTDB_HADR_SSL_PRIMARY.crt db2i1@db2test2:/dbdata/db2i1/.SSL/

db2inst2:
scp TESTDB_HADR_SSL_STANDBY.crt db2i1@db2test1:/dbdata/db2i1/.SSL/

Verify certificate files


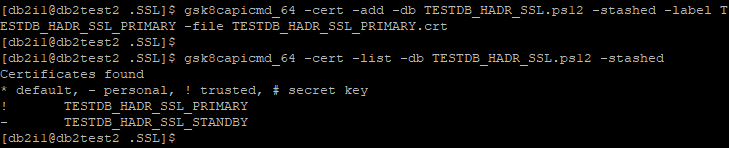
Step 5: Add extracted certificate file of db2test1 in local KeyStore of db2test2 and vice versa.
db2inst1:
gsk8capicmd_64 -cert -add -db TESTDB_HADR_SSL.ps12 -stashed -label TESTDB_HADR_SSL_STANDBY -file TESTDB_HADR_SSL_STANDBY.crt
gsk8capicmd_64 -cert -list -db TESTDB_HADR_SSL.ps12 -stashed

db2inst2:
gsk8capicmd_64 -cert -add -db TESTDB_HADR_SSL.ps12 -stashed -label TESTDB_HADR_SSL_PRIMARY -file TESTDB_HADR_SSL_PRIMARY.crt
gsk8capicmd_64 -cert -list -db TESTDB_HADR_SSL.ps12 -stashed
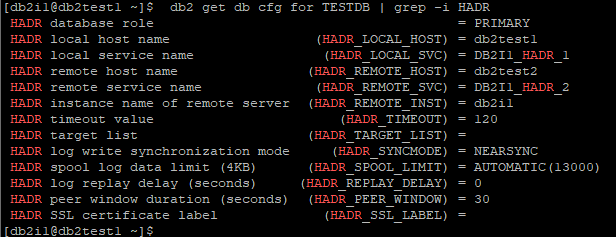
Step 6: Update DBM CFG.
Update DBM CFG parameter SSL_SVR_KEYDB, SSL_SVR_STASH on both db2test1, db2test2. To configure SSL for HADR communication, there is no need to configure DBM parameters like SSL_VERSIONS, SSL_SVCENAME, SSL_SVR_LABEL, also no need to set db2 registry variable DB2COMM=SSL
db2 update dbm cfg using SSL_SVR_KEYDB /dbdata/db2i1/.SSL/TESTDB_HADR_SSL.ps12
db2 update dbm cfg using SSL_SVR_STASH /dbdata/db2i1/.SSL/TESTDB_HADR_SSL.sth


Step 7: Stop HADR and restart instance.
Stop HADR on both Primary and Standby nodes and restart instance.
db2test1:
db2 stop hadr on db TESTDBdb2 deactivate db TESTDB
db2stop
db2start

db2test2:
On standby node, first deactivate database and then stop HADR, else you might get error SQL1769N Reason code 2.db2 deactivate db TESTDB
db2stop
db2start


If you liked this blog and interested in knowing more about DB2, please subscribe by clicking on Subscribe to ChoudharySumit.com by Email.
No comments:
Post a Comment