DB2 Native Encryption protects your DB2 database against threat at rest but this does not secure your data at transit. Even though your database is encrypt but malicious user can tap communication between your database and clients to view and modify data in transit. To secure your database at transit you can configure SSL communication between your application and database server, so that all communication goes through secure tunnel. DB2 support TLS version 1.0, 1.1 and 1.2. TLS 1.2 is not enabled by default. You can configure DB2 to support only TLS 1.2 or all of them i.e. TLS 1.2, 1.1 and 1.0. In this blog we will go through steps to configure DB2 SSL on DB2 server as well as on DB2 client. If you are interested to know about DB2 Native Encryption feature check blog DB2 Native Encryption, check blog Encrypt DB2 Database for steps to configure DB2 Native Encryption.
Configure DB2 SSL
Step1: Prerequisite
For SSL to work, digital certificate is require. You would need a digital certificate signed by certificate authority (CA) or you can self signed your digital certificate. If your database and clients are in private network then self signed digital certificate should be fine.
Steps to configure SSL using self signed digital certificate and digital certificated signed by CA is same.
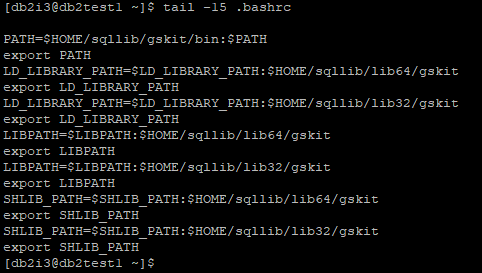
Step 2: Include gskit in LD_LIBRARY_PATH, LIBPATH, SHLIB_PATH environment variable.
Update LD_LIBRARY_PATH, LIBPATH, SHLIB_PATH to include both 32 and 64 bit gskit path. Update DB2 instance user profile file to include below
PATH=$HOME/sqllib/gskit/bin:$PATH
export PATH
LD_LIBRARY_PATH=$LD_LIBRARY_PATH:$HOME/sqllib/lib64/gskit
export LD_LIBRARY_PATH
LD_LIBRARY_PATH=$LD_LIBRARY_PATH:$HOME/sqllib/lib32/gskit
export LD_LIBRARY_PATH
LIBPATH=$LIBPATH:$HOME/sqllib/lib64/gskit
export LIBPATH
LIBPATH=$LIBPATH:$HOME/sqllib/lib32/gskit
export LIBPATH
SHLIB_PATH=$SHLIB_PATH:$HOME/sqllib/lib64/gskit
export SHLIB_PATH
SHLIB_PATH=$SHLIB_PATH:$HOME/sqllib/lib32/gskit
export SHLIB_PATH
Step3: Create KeyStore and self signed digital certificate, extract certificate from Keystore
Create a local Keystore of type PKCS12 using below gsk8capicmd_64 command using stash option.
gsk8capicmd_64 -keydb -create -db "DB2TEST1_DB2I3_ssl.ps12" -pw "P@ssw0rd_Db@i#" -type pkcs12 -stash

gsk8capicmd_64 will not give any output on completion, it will create 2 files in your current working directory. It is necessary to create Keystore with stash option otherwise for every Keystore access you need to provide Keystore password.
You should ensure that your Keystore and stash file is secure, to do this change your Keystore directory access to 700.
chmod 700 /home/db2i3/.KeyStore

Create a self signed digital certificate using below gsk8capicmd_64 command
gsk8capicmd_64 -cert -create -db "DB2TEST1_DB2I3_ssl.ps12" -pw "P@ssw0rd_Db@i#" -label "DB2TEST1_DB2I3_ssl" -dn "CN=db2test1"

In case of digital certificate signed by CA, you need to import it in your local database using below command
gsk8capicmd_64 -cert -import -db "SSL_CERTIFICATE.crt" -pw "P@ssw0rd" -target "DB2TEST1_DB2I3_ssl.ps12" -target_stashed
-db indicates certificate name, -pw indicates password associated with certificate, -target indicates local Keystore, -target_stashed indicates stash file is available to authenticate access to local KeyStore.
Verify Certificate in KeyStore using below gsk8capicmd_64 command
gsk8capicmd_64 -cert -list -db "DB2TEST1_DB2I3_ssl.ps12" -stashed

Get details of certificate in KeyStore using below command
gsk8capicmd_64 -cert -details -db "DB2TEST1_DB2I3_ssl.ps12" -stashed -label "DB2TEST1_DB2I3_ssl"

Extract certificate from Local KeyStore using below gsk8capicmd_64 command for distribution to client system.
gsk8capicmd_64 -cert -extract -db "DB2TEST1_DB2I3_ssl.ps12" -stashed -label "DB2TEST1_DB2I3_ssl" -target "dbserver_ssl.crt"

On completion it will generated a file specified with -target option, -db indicates local KeyStore name, -stashed indicates stash file is available to authenticate access to local KeyStore, -label indicates label to certificate to be extracted, -pw indicates password associated with certificate.
Step4: Update Database Manager (DBM) parameters and registry variable.
Update DBM parameters
db2 update dbm cfg using SSL_SVR_KEYDB $HOME/.KeyStore/DB2TEST1_DB2I3_ssl.ps12
db2 update dbm cfg using SSL_SVR_STASH $HOME/.KeyStore/DB2TEST1_DB2I3_ssl.sth
db2 update dbm cfg using SSL_VERSIONS TLSV12
db2 update dbm cfg using SSL_SVCENAME 50003
db2 update dbm cfg using SSL_SVR_LABEL DB2TEST1_DB2I3_ssl

SSL_SVR_KEYDB specify fully qualified path of local KeyStore
SSL_SVR_STASH specify fully qualified path of local KeyStore stash file
SSL_VERSIONS specify TLS version to be supported. TLSV12 indicates only TLS 1.2 will be supported. You can keep it null or TLSV1 to support only TLS 1.0 and 1.1. You can update it to TLSV1,TLSV12 to support TLS 1.0,1.1 and 1.2.
SSL_SVCENAME specify port on which DB2 will accept TLS connections.
SSL_SVR_LABEL specify label of certificate in local KeyStore which will be used for SSL connection
Update Registry Variable
db2set DB2COMM=SSL

DB2COMM specify protocol used for communication with remote clients. SSL indicates DB2 will only support SSL protocol for remote client communication. You can also set it to SSL,TCPIP to support both SSL,TCPIP protocol for remote client communication.
Step5: Restart DB2 Instance.
Stop DB2 Instance using db2stop command

Start DB2 Instance using db2start command

Step6: Configure DB2 Client to use SSL for communication
Copy certificate file dbserver_ssl.crt generated in step3 to Client system.
DB2 CLP, IBM Data Server client or IBM Data Server Run Time client
Configure user profile to include both 32 and 64 bit gskit path in LD_LIBRARY_PATH, LIBPATH, SHLIB_PATH, follow Step 2. If gskit in unavailable install gskit first.
Create a local Keystore of type PKCS12 using below gsk8capicmd_64 command using stash option.
gsk8capicmd_64 -keydb -create -db "db2appl.ps12" -pw "P@ssw0rd" -type pkcs12 -stash

Add certificate extracted from DB Server KeyStore to Client system KeyStore. Before adding certificate to client system KeyStore ensure you have copied Server certificate from DB server.
gsk8capicmd_64 -cert -add -db "db2appl.ps12" -pw "P@ssw0rd" -label "DB2TEST1_DB2I3_ssl" -file "dbserver_ssl.crt"

Update client DBM parameters
db2 update dbm cfg using SSL_CLNT_KEYDB $HOME/.SSL/db2appl.ps12
db2 update dbm cfg using SSL_CLNT_STASH $HOME/.SSL/db2appl.sth

Catalog Remote Database on Client system
db2 catalog TCPIP NODE DB2TEST1 REMOTE 192.168.0.201 SERVER 50003 SECURITY SSL
db2 catalog DATABASE TESTDB AS TESTDB AT NODE DB2TEST1 AUTHENTICATION SERVER

Test DB2 Connection

Verify Connection is SSL connection
Identify client connection application id on DB server using db2 list application command.

In above application id 192.168.0.203.57680.201012001420, 57680 is client port number, after performing grep for 57680 on netstat -a, local address port is 50003 which is SSL port, hence confirmed connection from client 192.168.0.203 is using SSL for connecting to TESTDB database.
DB2 ODBC/CLI Driver Connection String
Driver Version 10.5 FP 5 or above
Ensure DB Server certificate file dbserver_ssl.crt is present on client system.
"Database=TESTDB; Protocol=tcpip; Hostname= db2test1; Servicename=50003; Security=ssl; SSLServerCertificate=dbserver_ssl.crt"
Driver Version prior to 10.5 FP 5
Ensure local KeyStore got created and DB Server certificate dbserver_ssl.crt was added to local KeyStore.
"Database=TESTDB; Protocol=tcpip; Hostname= db2test1; Servicename=50003; Security=ssl; SSLClientKeystoredb=db2app1.ps12; SSLClientKeystash=db2app1.sth"
Db2 .Net Data Provider Connection String
Client Version 10.5 FP 5 or above:
Ensure DB Server certificate file dbserver_ssl.crt is present on client system.
String connectString = "Server=db2test1:50003;Database=TESTDB;Security=ssl; SSLServerCertificate=dbserver_ssl.crt";
Client Version prior to 10.5 FP 5:
Ensure local KeyStore got created and DB Server certificate dbserver_ssl.crt was added to local KeyStore.
String connectString = "Server=db2test1:50003;Database=TESTDB;Security=ssl; SLClientKeystoredb = db2app1.ps12; SSLClientKeystash=db2app1.sth";
Java Connection String
Create Java KeyStore and import server certificate file generated in Step 3.
keytool -import -trustcacerts -alias DB2SSL -file dbserver_ssl.crt -keystore db2.jks -storepass xyzz
java.util.Properties properties = new java.util.Properties();
properties.put("user", "xxxx");
properties.put("password", "yyyy");
properties.put("sslConnection", "true");
properties.put("sslTrustStoreLocation","db2.jks");
properties.put("sslTrustStorePassword","xyzz");
java.sql.Connection con = java.sql.DriverManager.getConnection(url, properties);
or
jdbc:db2://db2test1:50003/TESTDB:sslConnection=true;sslTrustStoreLocation=db2.jks;sslTrustStorePassword=xyzz;
Connect using DBeaver or IBM Data Studio
In case of error, check SSL Error to identify reason and fix it.
If you liked this blog and interested in knowing more about DB2, please subscribe by clicking on Subscribe to ChoudharySumit.com by Email.
Nice
ReplyDeleteGood work
ReplyDeleteThanks for the article. This helped me.! :)
ReplyDeleteHi Sir, I have followed all steps , step by step. but i'm facing
ReplyDeleteSOCKET=RECV RETURN CODE=1121 REASON CODE=77A9733D in host
in db2 connect (linux)
SQL30081N A communication error has been detected. Communication protocol
being used: "SSL". Communication API being used: "SOCKETS". Location where
the error was detected: "". Communication function detecting the error:
"sqlccSSLSocketSetup". Protocol specific error code(s): "414", "*", "*".
SQLSTATE=08001
Please help
Are your trying to connect mainframe database using DB2 Connect?
Deleteyes
DeleteI can see below error message in diag log file
DeleteDIA3604E The SSL function “gsk_secure_soc_init” failed with the return ode “414” in “sqlccSSLSocketSetup”
while connecting to mainframe database from DB2 Connect server you are getting this error? Or while connecting to mainframe database using db2 connect from some third server you are getting this error?
DeleteAlso I hope you have set DB2COMM=SSL registry variable and SSL_SVCENAME DBM parameter is set to unique value and not same as SVCENAME. DB2 Connect instance was restarted after parameter changes.
Did you check if DB2 Connect instance is listening on SSL port? You can use netstat -a on Linux/Unix system to verify that or telnet to SSL port to see if it listening.
Sir, for the late replay, I'm Db2 z/OS system DBA, I'm not familiar with Linux Db2.
ReplyDeleteI'm getting the error while connecting to mainframe hot using below connect command
-bash-4.2$ db2 connect to DBAD user userid using Password
SQL30081N A communication error has been detected. Communication protocol
being used: "SSL". Communication API being used: "SOCKETS". Location where
the error was detected: "". Communication function detecting the error:
"sqlccSSLSocketSetup". Protocol specific error code(s): "414", "*", "*".
SQLSTATE=08001
here is my configuration
-bash-4.2$ db2set -all
[i] DB2TERRITORY=1
[i] DB2COMM=TCPIP,SSL
[i] DB2CODEPAGE=1208
[g] DB2SYSTEM=db2inst1
-bash-4.2$ db2 get dbm cfg | grep SSL
SSL server keydb file (SSL_SVR_KEYDB) = /home/db2inst1/KeyStore/DB2DTEST1_ssl.ps12
SSL server stash file (SSL_SVR_STASH) = /home/db2inst1/KeyStore/DB2DTEST1_ssl.sth
SSL server certificate label (SSL_SVR_LABEL) = DB2DTEST1_ssl
SSL service name (SSL_SVCENAME) = 50001
SSL cipher specs (SSL_CIPHERSPECS) = TLS_RSA_WITH_AES_256_CBC_SHA256
SSL versions (SSL_VERSIONS) = TLSV12
SSL client keydb file (SSL_CLNT_KEYDB) = /home/db2inst1/KeyStore/appl/db2appl.ps12
SSL client stash file (SSL_CLNT_STASH) = /home/db2inst1/KeyStore/appl/db2appl.sth
TCP/IP Service name (SVCENAME) = db2inst1
SSL service name (SSL_SVCENAME) = 50001
Did you check if DB2 Connect instance is listening on SSL port? You can use netstat -a on Linux/Unix system to verify that or telnet to SSL port to see if it listening.
-bash-4.2$ netstat -a
Active Internet connections (servers and established)
Proto Recv-Q Send-Q Local Address Foreign Address State
I can see too may entries, kindly provide mode details, what exactly i should look for.
Thanks
Ramana
Did you configured SSL at mainframe server as well? If not you need to do that as well. If you need further help reach out to me on contact details mention in Contact Me page. https://www.choudharysumit.com/p/contact.html
DeleteI think, the same certificate has to import at MF db side to handshake between UDB client and MF subsystem.
DeleteThank you so much Sumit for beautifully explained contents
ReplyDeleteExcellent article. I followed these steps and able to test SSL connection successfully. When exploring this concept generally in the internet, the required info are scattered in separate websites and it took time for me to explore those but your single article acts like an encyclopedia which covers everything needed to configure and test, that too with good tech info for each steps to understand the process. You are doing a great job to the database community.
ReplyDeleteGood work!!
ReplyDelete